Your pet may be sent home from their time in the pet hospital with bandages around their paws. It's important to keep a close eye on their bandages so they can heal quickly and without complications.
In this video, BluePearl certified veterinary technician Kate Morrison walks you through how to care for bandages and monitor your pet's toes at home.
Video transcription.
Hi there. My name is Kate Morrison, and I'm a certified veterinary technician at BluePearl Pet Hospital in Sarasota, Florida. Today, I'm going to talk to you about how to monitor and assess your pet's bandage at home. It's also important to make sure you're following your veterinarian’s instructions as far as how often you should bring your pet back to your vet to have the bandage changed or replaced.
When monitoring and assessing your pet's bandage, it's important to gather any materials you may need. One is a camera to take visual documentation of what your pet's bandage looks like on a once- to twice-a-day basis. A phone or a normal camera can be used for this. Waterproof material for the outside of your pet's bandage is also important to keep in mind when taking your pet outside for walks. You can use something as simple as a Ziploc bag, rubber gloves, or even something as simple as a poop bag to cover the outside of your pet's bandage. To protect the bandage from your pet, it's recommended to place an e-collar around your pet's neck so they aren't able to chew or lick at their bandage.
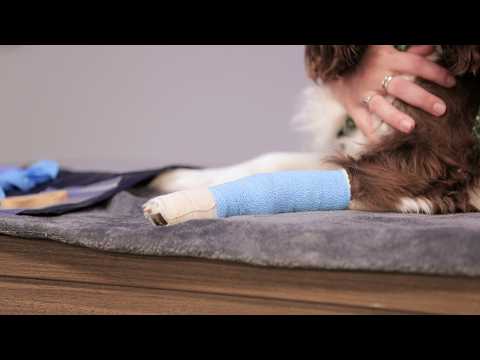
This is Georgie Girl. She's going to help us demonstrate how to monitor bandages at home. We just placed a new bandage on Georgie's front left paw. If your pet has a bandage, it's very important to make sure that we're doing visual assessments at least twice a day so we know what it's supposed to look like. I recommend that before leaving your vet’s office, you look thoroughly at the bandage, how high it is on the limb and how many toes are exposed. You can also use your cell phone camera to take pictures daily to notice any minute changes in the bandage. We really want to look for any slipping and any changes in what we're seeing at the toes that are exposed at the bottom.
When assessing your pet's bandage, we want to make sure that it's clean, dry, and intact. Using your baseline photos, you can compare the top of the bandage to make sure there hasn't been any slipping over time. We also want to look at the toes at the bottom if they are exposed. Feel them and make sure there's no excessive swelling. You can use the normal foot to compare the toes to see if swelling is developing.
If your pet isn't under direct supervision or if they have a curious mouth, we want to make sure we're applying an e-collar so they don't chew or lick at their bandage. You can get an e-collar at most pet stores and also from your veterinarian. When applying an e-collar, you want to go under their chin and around their neck. They might be a little worried, so we want to make sure we're giving them plenty of encouragement, reassurance, and treats along the way. Wrap the e-collar around their neck and make sure you don't close any ears or pinch any areas of skin before fastening it. Some e-collars fasten in different ways, but this one has clips that snap into holes. For a proper length of an e-collar, make sure your pet's nose cannot go past the edge of the collar. That will ensure they won't be able to reach their toes.
When you take your pet outside for a walk and they have a bandage, make sure you apply a waterproof barrier to keep the bandage dry and clean. You can use different household items if you're not provided with one or don't purchase one from a store. A Ziploc bag, a stretchy glove, or one of your dog's poop bags can work. You can secure it temporarily with a small piece of tape, a hair tie, or an elastic band. The major takeaway is to remove the covering after the walk because we want to prevent water from getting in, but we also don't want to trap moisture under the waterproof barrier. Walks are the only time you should apply this barrier.
For example, you can slide a poop bag over the bandage and tie a small knot in the side of the bag, or use painter's tape or a hair tie to secure it. Just remember to remove it afterward so it doesn't cause excessive pressure over the limb.
When assessing your pet's bandage, it's very important to check it at least twice a day so you notice any changes quickly before they become a problem. The baseline photos you took when your pet first had their bandage placed can be very helpful for comparison. I recommend taking pictures each time you assess the bandage if you're concerned.
There are a few things to watch for that would warrant taking your pet to your veterinarian. Make sure the bandage still has good integrity and remains clean, intact, and dry. If you notice that the bandage is soiled, wet, or no longer looks as clean and precise as it did in your baseline pictures, you should bring your pet to the veterinarian for an assessment.
Other indicators that the bandage may not be functioning properly include changes in your pet's gait or signs of discomfort when using that leg. If they were using it well initially and suddenly their gait changes or they stop putting weight on that leg, it could mean the bandage has slipped or is causing a pressure sore. That would warrant having the bandage replaced sooner than originally recommended.
You should also look around the edge of the bandage where it meets your pet's skin to make sure there isn't excessive inflammation. If you notice redness, swelling, or irritation in those areas, we would recommend having the bandage replaced sooner.